Some years ago, I made an argument for affordable nanosats, which are also referred to as CubeSats.
This argument was based on the involvement of non-renumerated participants, such as students, educational leaders, volunteers or do-it-yourselvers, and would include the use of off-the-shelf hardware for the satellite build. When combining these aspects, the cost of nanosat construction was seen to be quite affordable. Following a successful construction process, the only major cost item would then be the actual launch of the satellite into orbit.
With respect to this, I noted that there would be many components of the launch vehicle cost that are fixed and would have to be paid for by the owner of the primary payload (for instance, a communications satellite). These costs would not be directly related to the mass of the primary satellite and are fixed for the satellite mass +/- a few hundred kilograms. Other components of the launch vehicle are, however, variable with the mass of the payload.
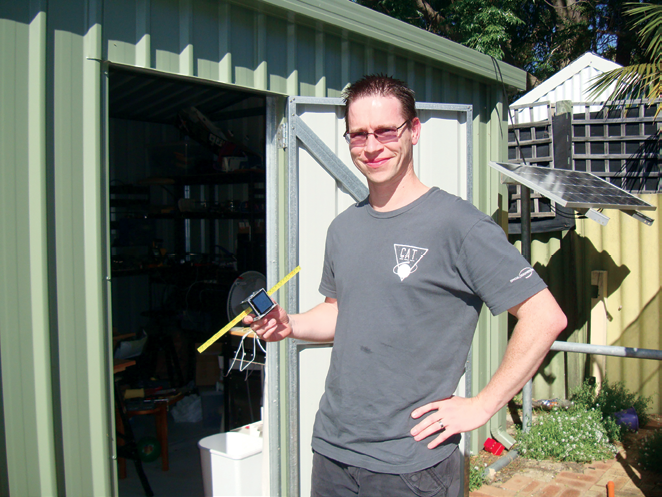
Stuart McAndrew and his OzQube-1
Additional costs would be limited to the installation of the launch deployment pod on the framework that would support the principal satellite (or some other part of the launch vehicle) and the additional fuel required to lift the additional 1 kg for the satellite plus approximately 1 kg. that would represent the launch pod, i.e., 2 kg. additional hardware to be lifted. A suggestion was made that the launch vehicle provider and/or the commercial satellite-to-be-launched owner might wish to offset this cost in exchange for the generation of goodwill.
I found an example of a do-it-yourselfer satellite builder almost directly on my own doorstep, that being Western Australia.
Stuart McAndrew, who calls himself an “amateur satellite builder,” is creating his own 5x5x5 cm “pocketcube” in his suburban shed and he is certainly one of a pioneering group of satellite aficionados in what is becoming a new growth technology hobby branch.
Jos Heyman
Please tell the SatMagazine readers about your background and your interests.
Stuart McAndrew
Ever since my childhood, I’ve had an interest in finding out how things worked. Originally this meant pulling apart toys to see how they worked, but fortunately that evolved into the construction of various electronic kits, and eventually, in my late teens, I undertook a project to transplant the entire Electronic Fuel Injection from one car into another.
I went to university to study a Bachelor of Science (Aviation), but due to the high cost of hiring an aircraft in order to obtain a Commercial Pilots License, I wasn’t able to complete the course. I did finish several units in IT related subjects, so I eventually pursued a career in that field. I’m currently an IT Systems Administrator for a local Western Australian company and have worked in the IT field for about 11 years.
Jos Heyman
How did you become involved in your satellite project?
Stuart McAndrew
After catching the space bug a few years ago, I started following the smallsat “revolution.” Late in 2013, there was a Kickstarter crowd-funding campaign for the PocketQube Shop, which was to fund the establishment of an online store for the mechanical structures of a new form factor of nanosatellite called a “PocketQube.” November 2013 was also the time when the first PocketQubes were launched into orbit aboard a Russian Dnepr rocket.
One of those PocketQubes, “$50SAT” or “Eagle-2”, was transmitting telemetry on the 70 cm HAM radio band, and the satellite builders had called out to radio amateurs for reception reports. They provided information using PC software that could decode the telemetry from the audio output of the radio signal.
At the same time, I’d started looking at the capabilities of using a USB TV tuner dongle as a Software Defined Radio (SDR). Putting the two together, I was able to receive the telemetry information from a chair in my lounge (much to the displeasure of my wife). This was a defining moment for me that showed what the PocketQube platform was capable of accomplishing.
Following the Kickstarter, I traded emails with the creator of the PocketQube project. We discussed the need for the establishment of a standard for the internal PocketQube components. Such would allow anyone creating board level systems for a PocketQube to enable their design to interoperate with other systems, much like the PC/104 used by CubeSats.
I became involved in discussions with various people around the world to establish the PQ60 standard. At the same time, I had become interested in using PCB design software to make an electronics project, as well as starting to tinker around with Arduino.com projects [Editor’s note: Arduino is an open-source electronics platform based on easy-to-use hardware and software and is intended for anyone involved in creating interactive projects.] I could see the potential of the PocketQube form factor and thought that building one would be a unique way to develop such skills for myself as well as demonstrate that a satellite could be built by someone who doesn’t have access to the resources that universities or government organizations often have available to them. After thinking about what kind of payload I’d like to have and finding the camera modules, I decided that I would create an Earth Observation (EO) satellite.
Jos Heyman
Why are you undertaking the OzQube-1 project? What are your objectives and motivation for this effort?
Stuart McAndrew
One reason was purely for the fun of the project. Space is cool, so making something to travel into space sounded like a really fun idea. However, it turned out that this kind of fun involves lots of work and learning about subjects that I didn’t have any formal training in!
Another reason is because of the potential of the form factor. Even though CubeSats offer a significant cost reduction compared to full size commercial satellites, the price of hardware and launch is well over $100,000—far beyond the reach of most organizations. The concept of building a satellite whose hardware cost is under $1,000 has the potential to open up the industry. A huge number of students studying STEM subjects at high school or university would be able to have the opportunity to learn about the space industry in a highly practical way.
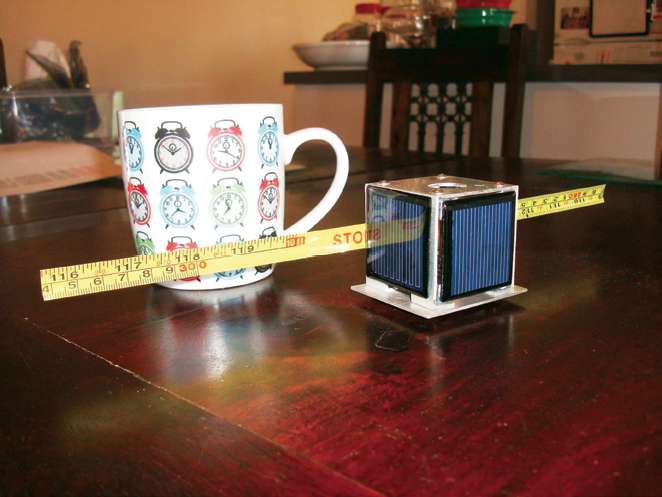
OzCube-1
Jos Heyman
Please describe the OzQube-1 design. What are the individual components and the actual payload. Are you using commercial-off-the-shelf products in your CubeSat build? Please explain what products you have decided to use, and why.
Stuart McAndrew
OzQube-1 is logically structured like many CubeSats and other small satellites. Solar cells are used for power generation, an EPS to charge the onboard battery and manage power to the other subsystems, a CDH module, a radio module and a payload module. Each subsystem is a separate PCB that I have designed for the project, with all of the internal PCB’s conforming to the PQ60 standard. [Editor’s note: The PQ60 standard is a community developed standard that defines the internal mechanical and electrical interfaces for a PocketQube satellite.] All of the electronic components are COTS (Commercial-Off-The-Shelf) parts, generally rated from -40 degrees to +85 degrees, with a few exceptions.
The main payload is a camera module. Small cameras have flown before on many CubeSat missions, but they are often low resolution VGA cameras. The camera I’m using is of similar design, but has an upgraded 2 Megapixel sensor. Only small changes are required to make it ready for space.
The EPS board is unique in that it is required to have a hole in the middle to clear the camera lens. This has made fitting all the components on the board a bit more difficult, but still quite manageable. The board contains 4 channel MPPT solar inputs, temperature compensated Li-ion battery charging, separate battery and 3.3V rails, both with current limiting switches as well as a separate switched circuit for the payload with its own current limiting switch.
The radio is a pre-built module based on the Silicon Labs Si4463 chipset and possesses a massive 1W RF power output, so it will only be performing burst radio transmissions in order to conserve power. This chipset was chosen so that the reception of the signal would be easy to accomplish with a basic antenna and a USB dongle. The radio module’s predecessor, the Si4432, was used in $50Sat.
The CDH module is based around an Atmel Atmega 328p microcontroller, the same as the one used in an Arduino Pro Mini and also contains a Micro-SD card, a 9 axis IMU (inertial measurement unit) and a RTC (real time clock).
Jos Heyman
How far are you into the project at this point in time?
Stuart McAndrew
To date, hardware for the first prototype is about 75 percent complete. I have completed boards for the radio, the EPS and the payload. I have developed an adapter for the CDH board to enable software development using a regular Arduino. This will be used until I can complete the final CDH board.
Two of the three different solar panel boards are on their way, with the last board still in the design phase. The EPS will soon get a second revision to rectify errors found in the first version and will provide some improvements.
While not being flight ready, most of the components have been designed with this in mind—only the assembly process needs to be revised for the construction of a flight version. Once the hardware is done I’ll be able to work on the software requires to get everything
co-ordinated and functioning.
Jos Heyman
What cost factors have you experienced and what is your budget to complete OzQube-1? Do you have any partners working with you on the project and, if so, what expertise do they bring to your work?
Stuart McAndrew
Starting a new hobby from scratch involves the procurement of the required tools of the trade, so to speak. As I was only just starting to get into electronic prototyping, I had to obtain some of the necessary tools and components to perform surface mount soldering. Staying with the low cost theme, I only purchased the minimum amount required to perform the task.
I don’t really have a budget for the project. I’m confident that the hardware cost per satellite will be well under $1,000 when completed. The project has been completely solo from day one. I have various contacts in other countries that I have had engineering discussions with, but apart from that, I have had no outside help.
Jos Heyman
How will you fund OzQube-1? Have you considered a “crowd sourcing” appeal to aid in financing?
Stuart McAndrew
So far, the project has been self-funded. The raw cost of components, PCBs and structural hardware required for a single satellite, as stated, will be below $1,000, not taking into account development time. Developing a flight version will require investment in a proper testing regime, in conjunction with more carefully selected components.
In addition, the cost of launching a satellite such as the OzQube-1 into orbit is prohibitive for an individual without strong financial backing, so there is a high probability that I’ll be using some kind of “crowd sourcing” to fund the flight versions and the launch costs—any donations are more than welcome!
Jos Heyman
How will OzQube-1 be launched? Given the size of your PocketQube, the most appropriate factor seems to be as a ride share payload—have any launch companies expressed interest in assisting in this endeavor?
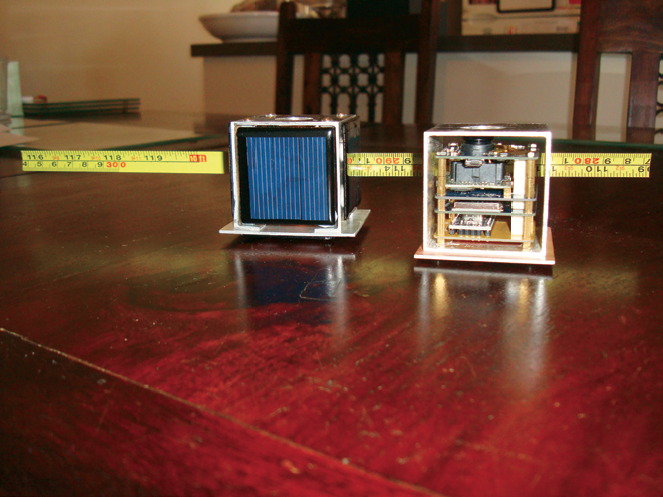
OzQube-1 + internals.
Stuart McAndrew
Currently, the only way to get a PocketQube into orbit is as a tertiary payload. The only deployer developed so far for PocketQubes is the MR-FOD (Morehead Rome Femtosatellite Orbital Deployer.) The upcoming Italian “UniSat-7” small satellite has several of those deployers onboard. The UniSat-7 satellite will be a secondary payload on a Dnepr launch vehicle. Gauss Team are the launch services provider for the Unisat satellite and are offering the space in the deployer on commercial terms, which is currently about 15,000 euros.
It is my hope that once the many dedicated CubeSat launch vehicles complete their development, the number of low cost launch opportunities for PocketQubes will increase.
Jos Heyman
Once OzQube-1 is on orbit, what are the next steps? What do you plan to do once OzQube-1 has been launched?
Stuart McAndrew
Making contact with OzQube-1 and validating the operation and performance of the subsystems is the first goal. Once that has been achieved, the second goal will be enabled—to obtain imagery of Australia and to communicate that imagery back to the ground.
The imagery will be transmitted using a variety of radio formats and modulations. I hope to enable the reception of images using low cost hardware and home-made antennas. This, in turn, may inspire others to try their hand at receiving data, or even try and build a satellite of their own.
Jos Heyman
Do you see yourself continuing to work within the small satellite environs in the future?

Stuart McAndrew
I hope that the experience I have gained throughout this project will position me to be part of the SmallSat movement in the future, whether such is via direct involvement with other missions, or whether it’s by enabling others to develop their own missions through the commercialization of the OzQube-1 design. I have a list of potential mission ideas for PocketQubes that require some more R&D and other specialist skills.
Jos Heyman is the Managing Director of Tiros Space Information, a Western Australian consultancy specializing in the dissemination of information on the scientific exploration and commercial application of space for use by educational as well as commercial organizations. An accountant by profession, Jos is the editor of the TSI News Bulletin.


